Picture this: You’re cruising through the vast landscapes of Southern Africa, the sun dipping below the horizon as you pull off into a secluded spot. Inside your converted Mercedes Benz Sprinter, it’s cosy and quiet—no drafts sneaking in, no condensation dripping from the walls, and your heater or AC working efficiently without draining your battery. This isn’t just a dream; it’s the reality of a well-insulated campervan. For DIY enthusiasts and professional builders alike, insulation is the unsung hero of any van conversion. It transforms a cold, echoey metal box into a comfortable, energy-efficient home on wheels.
At inspired-outdoors.co.za, we specialize in products that make Mercedes Sprinter conversions accessible and top-notch, including our popular PU spray foam kits designed for both hobbyists and pros. In this comprehensive guide, we’ll explore the various insulation options available for your campervan build. We’ll break down the pros and cons of each, drawing from real-world comparisons and expert insights. Ultimately, we’ll shine a spotlight on why polyurethane (PU) spray foam stands out as the superior choice—offering unmatched performance that elevates your adventure. Whether you’re tackling a weekend project or a full-scale build, understanding insulation will save you time, money, and headaches down the road.
Why Insulation Matters in Your Campervan Conversion
Before diving into the options, let’s talk about why insulation is non-negotiable. A bare Sprinter van is essentially a steel shell that conducts heat and cold like a champ—scorching in summer and freezing in winter. Proper insulation regulates temperature, making your van liveable year-round. It also reduces noise from road rumble and external sounds, minimizes condensation (which can lead to rust and mould), and boosts energy efficiency for off-grid living.
For Southern African explorers, this is crucial. Our climate swings from sweltering Kalahari days to chilly Drakensberg nights, and insulation helps you adapt without relying heavily on power-hungry systems. Plus, it adds structural integrity and can even improve resale value. Studies show that well-insulated vans maintain interior temperatures 11-17 degrees Celsius closer to comfortable levels, extending the life of your build and enhancing overall comfort. Now, let’s compare the main insulation contenders.
Exploring Your Insulation Options: A Head-to-Head Comparison
The world of campervan insulation is diverse, with materials ranging from traditional favourites to eco-friendly innovations. Each has its place, but the best choice depends on your budget, skill level, and priorities like RSI-value (thermal resistance in metric, m²K/W), ease of installation, and durability. Below, we’ll outline the most popular options, including their pros, cons, and typical applications in a Sprinter van.
For a quick overview please refer to this comparison based table.

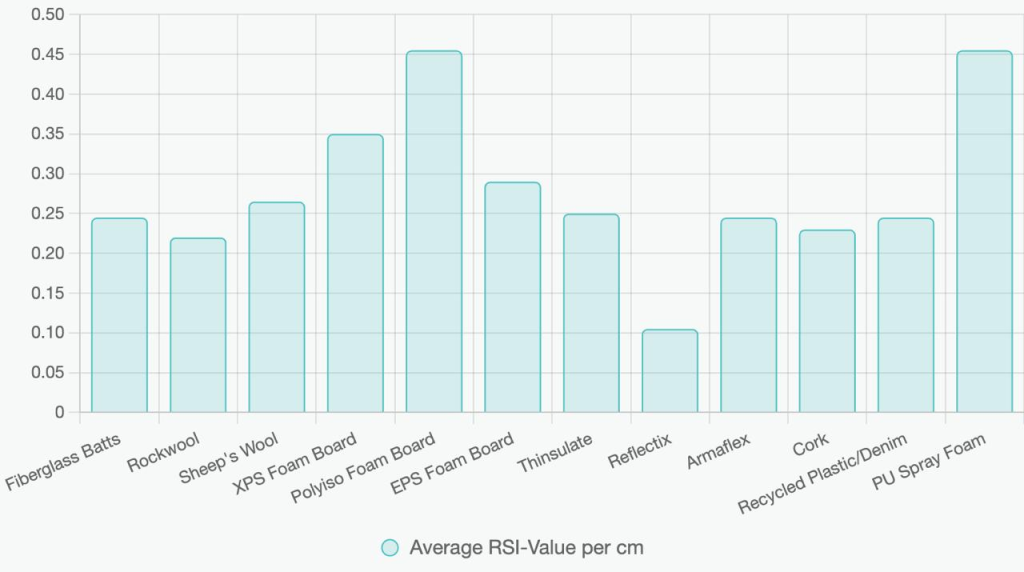
To visualize the thermal performance differences, here’s a bar chart comparing the average RSI-value per cm for each insulation type (using midpoints for ranges):
This table draws from extensive van conversion resources, highlighting how options like foam boards excel in RSI-value but falter in flexibility, while natural materials like wool prioritize sustainability. For Mercedes Sprinters, with their curved walls and ribbed structures, flexibility and gap-filling are key—areas where many rigid options fall short.
Starting with traditional choices, fiberglass and Rockwool are staples in home insulation but have drawbacks in vans. Fiberglass is cheap and widely available, but it requires vapor barriers to prevent moisture build-up, which can be tricky in a mobile environment. Rockwool offers better fire resistance and doesn’t hold water as readily, making it a solid pick for safety-conscious builders. However, both can be messy and irritating during installation, and they compress over time from vibrations, reducing effectiveness.
Natural alternatives like sheep’s wool and cork appeal to eco-warriors. Sheep’s wool is breathable and naturally regulates humidity, preventing condensation in humid climates. It’s also biodegradable and non-toxic. Cork, derived from tree bark, adds antimicrobial properties and decent insulation, often used as underlayment. But these come at a premium price and may require treatments against pests or mould, which isn’t ideal for long-term van life.
Rigid foam boards—XPS, Polyiso, and EPS—are popular for their high RSI-values and ease of cutting to fit flat surfaces like floors or ceilings. Polyiso boasts the highest thermal resistance, making it energy-efficient for off-grid setups. XPS is more water-resistant, suitable for areas prone to leaks. EPS is the budget option but lacks durability. The downside? They’re inflexible, leaving gaps in Sprinter’s irregular shapes, which can lead to thermal bridges (spots where heat escapes). Plus, they often need adhesives or mechanical fasteners, adding steps to your build.
Flexible options like Thinsulate and Armaflex shine in odd nooks. Thinsulate, a synthetic automotive insulation, is hydrophobic and stuffable, perfect for pillars and doors. Armaflex,
a rubber-based foam, sticks easily and handles curves well. Reflectix, often misused as primary insulation, is best as a radiant barrier—reflecting heat but offering little against conductive or convective loss without an air gap.
Recycled materials, such as denim or plastic batts, provide a green twist with good sound absorption and non-toxicity. They’re affordable and sustainable but can sag or underperform in extreme temps.
While all these have merits, none match the all-in-one prowess of PU spray foam, which we’ll explore next.
Why PU Spray Foam Outshines the Competition: The Benefits Breakdown
Enter polyurethane (PU) spray foam—the game-changer for campervan insulation. Unlike batts or boards that leave voids, PU foam expands to fill every crevice, creating a seamless, airtight barrier. This closed-cell variety (the type we recommend and sell in our kits) offers an RSI-value of 0.42-0.49 per cm, rivalling or exceeding Polyiso while providing superior air sealing.
First, let’s talk thermal performance. PU foam’s high RSI-value means better temperature control, keeping your Sprinter cool in scorching heat and warm in cold snaps. It outperforms wool or Thinsulate by up to 50% in efficiency, reducing the need for heating/cooling systems and extending battery life for solar setups. In real-world tests, vans with spray foam maintain stable interiors even in extreme conditions, unlike fiberglass which loses effectiveness when compressed.
Air sealing is where PU truly excels. It expands into gaps, cracks, and ribs—common in Sprinters—preventing drafts and thermal bridges that plague rigid boards. This dual role as insulator and sealant cuts energy loss by up to 40%, far better than options like Rockwool that require separate vapor barriers. For off-grid adventurers, this translates to less fuel or power consumption.
Durability is another win. PU foam is rigid once cured, resisting vibrations from rough roads—unlike wool or batts that settle over time. It’s also moisture-resistant, inhibiting mould and rust without needing additional membranes, a huge plus over absorbent materials like fiberglass. In humid Southern African regions, this prevents condensation issues that can ruin builds.
Noise reduction? Exceptional. The dense structure absorbs sound better than most, turning your van into a quiet retreat—outperforming Thinsulate or cork in acoustic tests.
Sustainability and safety: Modern PU foams have low VOC emissions post-curing, and they’re energy-efficient long-term, reducing your carbon footprint. They’re fire-retardant too, adding peace of mind over flammable options.
Cost-wise, while initial outlay is higher (R270-R540 per sq. m), it saves on labour and materials by eliminating tapes, barriers, and fillers. For DIYers, our kits make application straightforward—no pro needed.
Cons? It’s messy during application (wear PPE), and over-expansion requires trimming. Over expansion can also cause side panels to bulge and look uneven, so it is essential to apply the foam diligently in small parcels and evenly to avoid this pitfall. Once applied, it’s permanent—hard to remove for changes. But for a set-it-and-forget-it solution, it’s unbeatable. In comparisons, PU foam consistently ranks as the top choice for vans like Sprinters, where space and efficiency are premium.
Application Tips: Insulating Your Sprinter with PU Spray Foam
Ready to go pro? Start with prep: Clean and rust-treat your van’s interior. For walls and ceiling, apply 2.5-5 cm of closed-cell PU foam directly to metal— it adheres without primers. Use our kits for controlled expansion. Floors might combine PU with XPS for added rigidity. Always ventilate during curing (24-48 hours), and trim excess for a smooth base and then use a spray foam planer for a smooth, even and unparalleled surface finish, before panelling.
For pros, layer with reflective foil for hybrid efficiency. DIY tip: Practice on scrap—our kits include nozzles for precision.
Conclusion: Choose PU Foam for Unmatched Freedom on the Road
Insulating your Mercedes Sprinter isn’t just about staying warm; it’s about crafting a reliable escape for your adventures. While options like wool or foam boards have their niches, PU spray foam’s superior RSI-value, sealing, durability, and efficiency make it the clear winner—especially for rugged Southern African travels.
Head to our site to grab a PU spray foam kit tailored for Sprinter conversions. With easy shipping and expert support, you’ll be road-ready in no time. What’s your insulation story? Share in the comments below—we’d love to hear how you’re building your dream van!